Aircraft and Hanger!

This is my attempt at an Aircraft within a Hanger. I modelled it using 3DsMax and then rendered it out with the intention of colouring it in using my previously learnt colour techniques.

biplane&hanger


HANGER

HANGER_2


As you can see I did start adding colour to the image but then I also had another idea which I started. The second idea was a hanger that was inside a mountain, a bit like Pandora from Avatar.

003


I then expanded a little idea and drew the Hanger from the inside. I am still working on this part in photoshop.

005 (2)

SketchUp Military Mash Up

this is a technique we were shown a few weeks back  to come up with some simple and effective concept art in very little time. We used SketchUp‘s 3D ware house to chose some models then break them apart, rearrange them, and them place them in a way to come up with a new type of vehicle. In the following example I used a helicopter, tank, and a jet engine and some guns to produce a Helitank..

helitank01

helitank02

helitank03

I’m happy with the result, although i think my choice of vehicles could’ve been a little more  adventuress and perhaps something not so common in the world of video games.

Charlie and the Chocolate factory: The Chocolate Room

We were giving a group project a few weeks ago where we had to develop a game level based on a book. We chose Charlie and the chocolate factory as we felt this would give us a wide selection of games play choices and ideas.

In our game of Charlie and the chocolate factory you play as Charlotte Ruse, the girl who had a golden ticket for the factory tour but it turned out to be a fake. Charlotte is a bitter and twisted little girl who is out to seek revenge on the rest of the winners group in any way she can. Your aim is to claim the prize at the end of the tour of the factory for yourself, and along the way you have side objectives which happen to be the unfortunate events that happen to each of the winners group. For example; Charlotte will have the option to pull Augustus Gloop into the chocolate river, or You will be able to dress up as a Umpa Lumpa and give Violet Beuaregarde the flavour changing bubble gum.

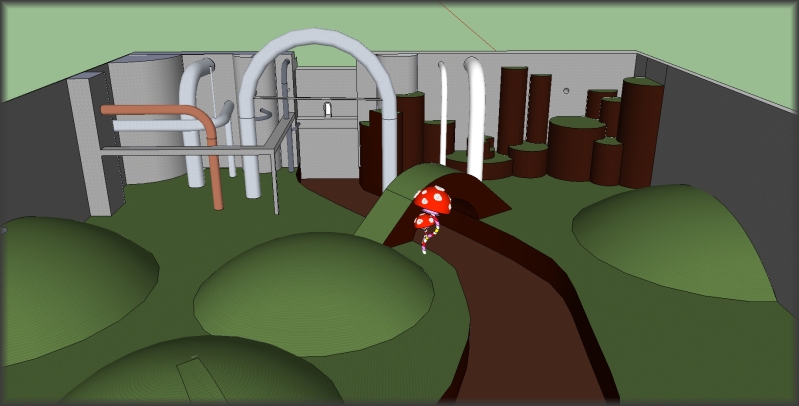
Charlottle will infiltrate the factory through the ‘chocolate sewer pipe’ and come in behind the chocolate waterfall in the chocolate room. You have to keep a low profile as your aim is to not let Willy Wonka know you in the factory as he may stop the tour all together. The Umpa Lumpa’s however know that you are there, but do not want to stop the winners tour of the factory and spoil their prize. You will have a few routes to take entering the chocolate room as the images below will show. Along your journey through the factory you will be able to collect items that will aid you in the navigation around such a vast area and obscure area. Also you will be able to collect coins which you can spend at the ‘corrupt Umpa Lumpa’ and buy additional items and costumes to help you on your mission.

In our group of 5 we each are working on a different room. I chose the chocolate room and the following images show my progress so far in developing a level design.

chocroom

chocroom_SU

chocroom_SUroutes

I have also started work making this area using UDK focusing mainly on the chocolate water fall and river. I will upload my results of this soon. I also came across this image: Lil_Chan_DigitalPainting_Final

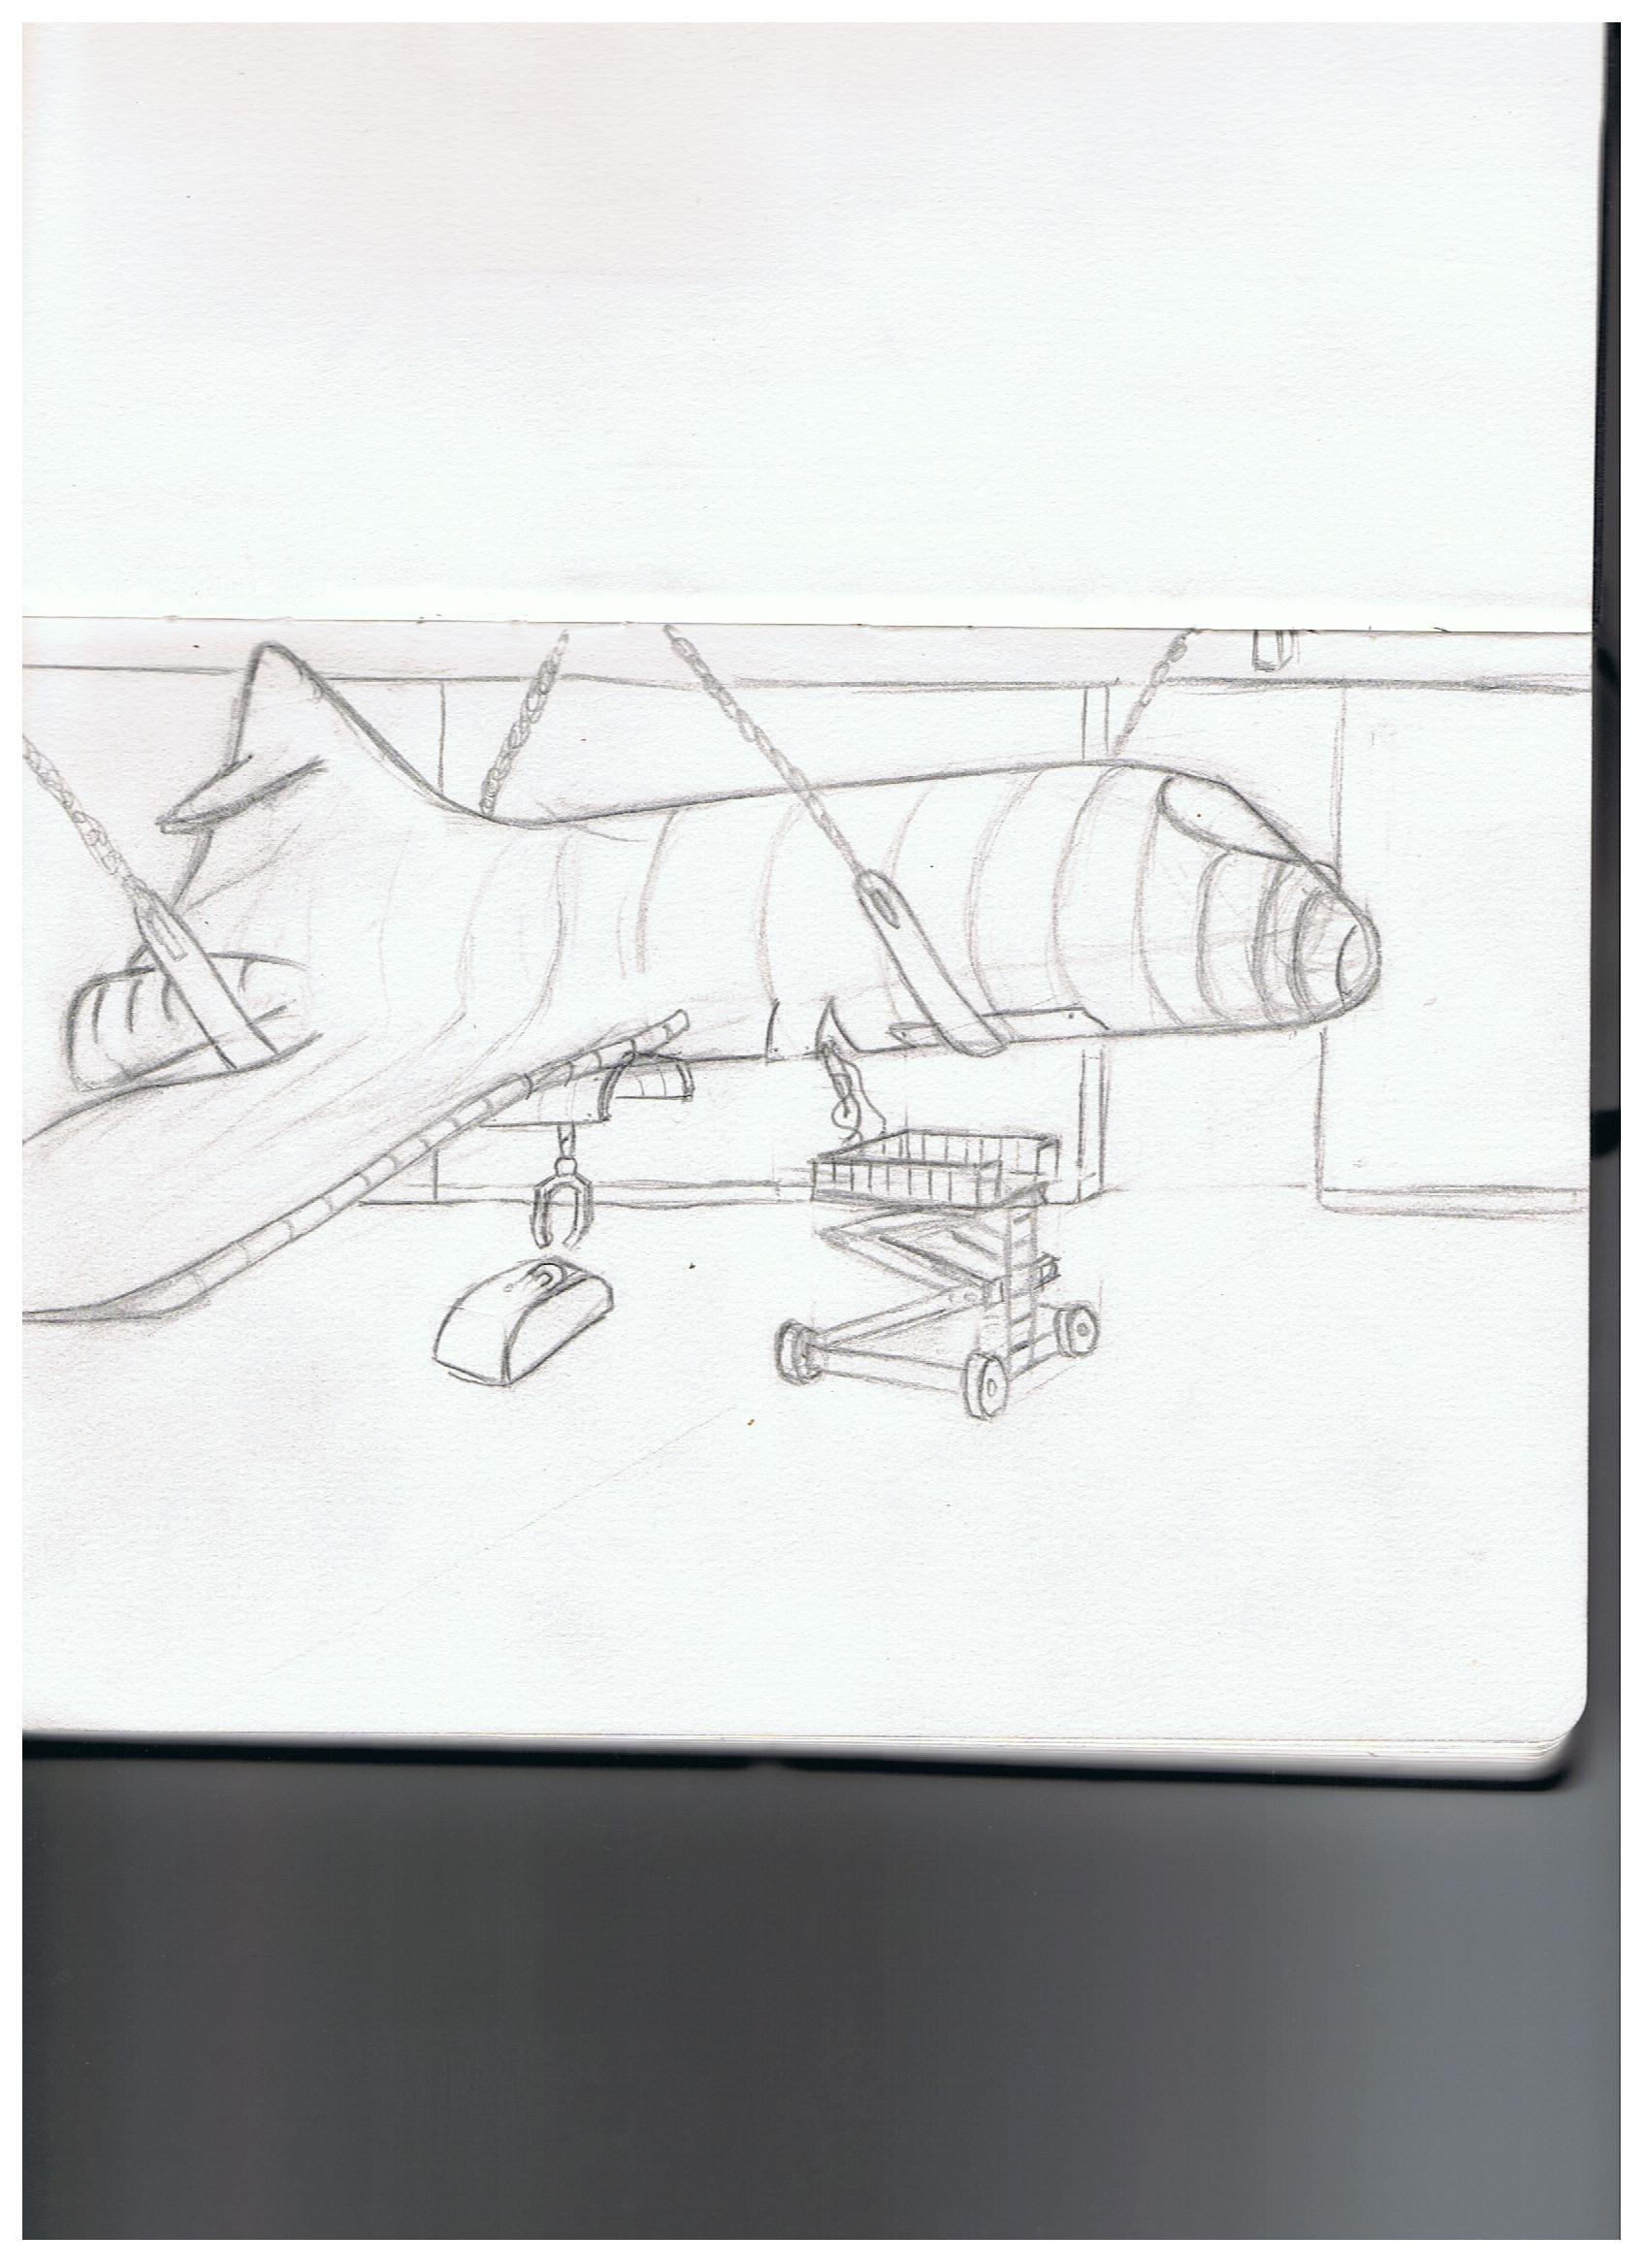
I think its a great piece of art work and and i love the idea of multiple chocolate streams merging into one big river. I think I would like to take this image and use it to influece the enviroment im making in UDK.

Photoshop: MashUp

Here is an image of a technique I learnt a few weeks back. I have Google images to find various parts that I needed within this collage to form a piece of concept art that could be seen as a hostage situation within a game. In the background I’ve added some explosions to add to the overall feel of the image. Perhaps the explosions are something you have coursed and you are trying to get to a save distance, but you are injured so you take a hostage to drive for you?

hostagedriver

I am pleased with the overall result although I do feel the explosions look a little out of place. Each image I used was cropped, edited and resized to fit this image  The HUD was added over the top using a colour overlay on some images to make them white,  and a simple box filled with a gradient to highlight the players selection.

Photoshop: Lasso Tool technique

Here is a simple piece  of concept I produced in about 30 mins using a simple technique. Using the lasso tool I scribbled out some lines and used my imagination to make it into something.  This happened to be a spacecraft, and using simple techniques I have learnt from earlier lessons in class, I quickly added a couple of buildings and some little details to give it a sense  of purpose .

I am happy with the result, although I do think it a technique that will improve with more practise. With that in mind I will give it ago a few more times and upload my results.

Sculptris: Another Demonic Creature.

I had another blast at Sculptris this evening, this time I went in with the idea of making a dragon type creature and have ended up with something that not a million miles away. Also for sculpt I challenged myself to not use any reference images, this way I had to thing where the muscle mass may be with in the creature using real life experiences.


And just for fun!


I’m happy with my results, and I feel that I have learnt a few different techniques. Next time I sculpt something I may try a humanoid of some sort, which I think will be move of a challenge. Also I may revisit this sculpt at a later date and add a body.

Mine Dash: Textures & Characters so far

After some thought I have decided that I will go for an 8/16 bit art style in my game ‘Mine Dash’ . With this in mind I set off thinking what would be the best way of producing this style of artwork for a game in flash? With flash being a vector based programme Illustrator sprung to mind. With this I could create pixel style art and reshape and size them without having to worry to much about the quality which is perfect for what I want to do. I found a very simple way of creating pixel art using Illustrators grid tool, and then using the paint bucket tool going through each square and adding colour.

Here are my textures, some wooden supports for the mine shafts, my main character Graham Gump, and what is going to be my level select screen. They are all vector based so can be made to any size needed and they can be tiled.

I will be making many more assets in this style to be used in my game. For example, the bats and rats from my basic level blog post, and the airlocks and maybe mine carts too. The great thing about doing it this way is that, once the scripting for my platform game is in place, I can then drag and drop these pre-made textures and assets into the game and have it looking the way I want  in half the time.

Graham Gump Character Sheet.

Here are is Graham Gump, the character of the bio I blogged a few weeks ago. I first sketched him up a while ago, then using the techniques I learnt when doing the line art exercise filled the sketch with colour, after scanning it into Photoshop, then selected areas to change the hue and saturation. I also had to go around the out line of what I had already drawn to make the edges stand out more, I tried a few different types of brush strokes, but settled with one that gives it a very sketchy look, almost broken pen like. I like the result that I have achieved but I do think I should have drawn a few more perspectives of the character as the completed sheet looks a bit dull. If I had of done this it would have given me more freedom on where i could place him when creating the final character sheet and it would of brighten the whole thing up.


There are also a few sketch’s of heads and a body in the first picture, in hindsight I could’ve included this in the character sheet to show that his current head could be replaced, or even as inspiration for another character the he could be related too.

Beer + Tablet + Sculptris = Hellhound?

This evening I decided to take a break from my assignment briefs and have a play around with sculptris for a second time. The first time I used it I just played around with the tools to get a feel for it and realised how simple, yet powerful this software could be. After a few beers and with a belly full of food I sat down and started noodling around again. I pushed and I pulled and something that started to resemble a dog’s head appeared. With this basic form in place I looked at a few pictures of dogs heads for reference and started adding definition to the blank elongated sphere. I soon realised how simple is was to build up areas of  ‘Clay’ and rough out details to get a general feel for what you are trying to achieve. After a few more beers and a couple more hours of playing around I have produced something I’m satisfied with for a first real attempt as using this, quite frankly, amazing piece of free software.

The images that follow are my work in various stages. I would hope to also produce a video tutorial in the future for the interest of other people wanting to get to grips with the software.

There are a few things I would like to improve on one being the teeth, but overall I’m pleased with the outcome, and I’m sure ill use this piece of software again soon!

Mine Dash: A simple level

Being happy with my game concept idea I sketched up a basic level. Not everything from my drawing in my sketch book went into the design when I roughed it up in ‘SketchUp 8’  but using the 2 images together and also with the image I’ve done in Photoshop you can see what I am aiming for.

My Drawing:


Putting in into SketchUp 8:


And then finally into Photoshop:


I think you can see what I’m trying to achieve within this level, and when I would create the final version in Photoshop or Flash, I would add all the finer details in like the mine carts and the metal girders. But for the sake of keeping the concept design clear I have left them out.